Showing posts with label prissy makeup. Show all posts

Friday, December 9, 2011

Mally Beauty Products Review

Hi dolls,

Today's post is only for the ladies. And while I'll be talking about toys, I promise it's nothing naughty.

I consider makeup to be like toys for us, grown ladies because new makeup always makes me feel as giddy as new toys made me feel when I was little.

Last month, I ran out of my favorite mascara. Usually this wouldn't be a big ordeal, since I could just go out and purchase a new one at the store. Right?

Wrong.

I had received the mascara in a free gift bag and had never even heard of the brand, so I decided to put on my detective hat and do some research on the brand. I discovered Mally Beauty.

Something I always do and urge everyone else to do is to either follow your favorite stores or brands on Facebook and Twitter because you will always have the latest updates including when they're having sales or giving out freebies, which can come in handy.

Mally, the founder and also a celebrity makeup artist announced that she'd be giving away a free tube of this amazing mascara with the purchase of anything on her site. I decided that this was the perfect opportunity to try out some other products and placed an order.

The following is my review on the products I purchased:
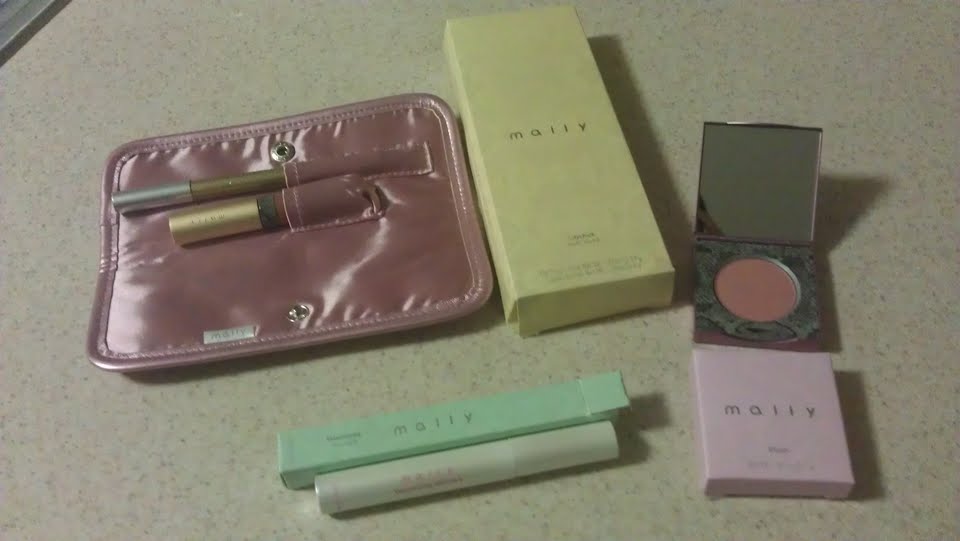


As you already might know I love adore my Mally Beauty volumizing mascara!

What it is: A unique formula that helps natural eyelashes look fuller and luxurious.

What it does: It not only greatly enhances your real lashes, but it does so clump free and if you're like me and you don't particularly like to use an eyelash curler than this is the perfect mascara for you.

Bonus: It lasts all day!


Mally Volumizing Mascara.


You can also check out my first review of this mascara right here.

Blush is a necessity for any girl regardless of what her makeup routine is. A little pop of color on your cheeks goes a long way and really enhances your overall appearance.

I've always had a fascination with pink blushes, I think they're so pretty. But lately I had been using bronzers because of my undertone colors. Apparently my undertone colors don't go well with the color pink, but I personally think pink makes me look very pretty and sweet.

So I took back control of my makeup and ordered a pink shade called Mally's Baby, which is a pink/peach color with a hint of gold shimmer.

What it is: A one kit blush system.

What it does: It delivers a burst of color that lasts about 6 hours.

Bonus: It comes in a super cute compact that is small enough to carry in your handbag for whenever you need a touch up.

Mally's Baby Single Blush. 


What's more perfect than a nude lip? Nude lips are great for both day and night. But achieving the nude lip look can be complicated and if not done right you can end up looking like you're sick, which is why I took advantage of the City Chick Nude Lip Kit.

What it is: A kit that includes a double-sided pencil: one side is a primer that moisturizes your lip, the other side is a lip liner and a high shine nude lip gloss.

What it does: It creates the perfect nude pout because the primer moisturizes your lips, which prevents the chapped effect.The liner helps contour your pout and the high shine gloss adds the the perfect touch of shine to complete an otherwise boring matte look.

Bonus: You can use the lip gloss by itself. You can also use the primer underneath any lipstick or lip gloss to keep your lips from looking chapped.


City Chick Nude Lip Kit.


Overall Review: Mally Roncal makes beauty simple and long-lasting. I'm now a Mallynista for life. 


I not only love trying new things, but getting the opportunity to share my experiences with you on my blog is very rewarding. I hope to continue to dazzle you through 2012 and thank you for allowing me to share my discoveries and passion with you during 2011.

Beauty obsessed yours!

-Xo

“Makeup is simply the accessory that allows someone’s true nature and beauty to outwardly manifest itself.” Mally Roncal

Thursday, August 4, 2011

The Ugly Truth About Keratin

Ladies, welcome back!!

Today's topic is keratin hair treatment, which if you haven't already heard of then you must be living under a rock.

As us women discover new ways to cope with humidity and other weather conditions that leave our hairs frizzy and unmanageable, keratin has become yet another must on our long list of beauty rituals.

I just had a treatment applied a few weeks ago (third treatment in the past year) and I have paid a lot of money to have my hair look shiny and healthy.

I want to paint you guys a picture, I have done all three of these treatments with different professionals and different products because I haven't been satisfied.

Why haven't I been satisfied, you ask.

Expectations!

From the beginning, I heard all these incredible things about this treatment. It almost sounded too good to be true and it was.

So today's blog is designed to help you understand what keratin is and what it can and should do for your hair.

Let's start off with the definition of keratin, which is a natural protein that is found in skin, hair and nails.

With that said, you can expect keratin hair treatments to make your hair healthier, shinier and softer.

The treatment itself consists of applying the  keratin product to your hair and activating the keratin with the heat of a blow dryer and flat iron.

Keep in mind that the very same things that strip our hair of its natural elements are some of the tools we need to use to infuse keratin.


The History of Keratin:

The treatment was developed in Brazil and made its way to the US around 2006. Since then women all around the country have been paying top dollars for 3-4 months of healthy hair that is easy to manage.

Why is it so expensive?

The treatment is expensive because the product itself is still costly. One bottle of 16 ounces can easily go for as much as $200 or even more.

Most salons will charge about $200 for one treatment depending on the length and thickness of your hair because it is a grueling process that can take up to 2 hours to complete.

Types of Products:

Since its introduction to the US, there have been many variations of the keratin mostly because of its ingredients.

A lot of the first keratin products contained formaldehyde, a colorless gas that has been recognized as a carcinogen. You can immediately tell if a keratin product contains formaldehyde because of the harsh smelling chemicals in it.

The original product that is used in Brazil is banned in the U.S., although you can find people who do the treatments from their home and have ways of getting their hands on the original product.

There are now keratin products that are formaldehyde-free, which will restore your damaged hair into shiny and smooth hair, but will not change the structure of your hair.

Treatment:

Originally BKT (Brazilian Keratin Treatments) was known as a method of straightening out your hair temporarily by sealing the hair with keratin and a flat hair iron.

However, formaldehyde is the actual chemical that straightens your hair and not the keratin alone, so if you're considering a method to straighten your hair, an original BKT is what you'd need, but it's something that I personally am against.

Besides the toxic chemicals that you can inhale, which can cause bodily harm, you also risk burning your scalp.

There are so many things said about keratin treatments and some things are true and other things are plain myths.


Truths:
  • Keratin is not a miraculous product that will fix all of your hair woes.
  • Keratin does provide smooth, shiny, soft hair.
  • It helps control frizziness.
  • Heat activates the keratin, so after every wash make sure you at least flat iron your hair for that soft, frizz free look.
  • The keratin makes it easier for you to style or straighten your hair.
  • Do not wet your hair for at least 72 hours.
Myths:
  • It doesn't straighten your hair (unless you are using keratin products with formaldehyde.)
  • It doesn't last 6 months, at the most you are looking for a good 3-4 months and remember the less you wash your hair, the longer the product  will remain in your hair.
  • A lot of hair stylists will tell you to not pick up your hair, tuck it behind your ear or do anything that can cause a ripple. This is more of a guarantee for the work that  they have done on your hair, because once the keratin is applied to your hair it forms a bond with it and will not come undone just because you decided to pick it up in a pony tail. 
  • Cut your ends before you do a keratin hair treatment. Again, it doesn't matter when you cut your hair (you can do it before or after the treatment) the keratin seals on the second it touches hair.
Recommendations:
  • Gather as much information about keratin as you possibly can.
  • Make sure that the stylist you choose is an expert and can answer all of your questions.
  • About a week before doing the treatment, do a deep conditioning hair treatment (Moroccan/Argan oil work great.)
  • Either wash or ask the stylist to wash your hair with a clarifying shampoo and opt to not use conditioner.
  • Keratin needs to be left in the hair for about 25 minutes.
  • After 25 minutes, the hair should be blow dried and flat ironed to seal the keratin into your strands.
  • Use a a sulfate-free shampoo to care for your hair after any keratin treatment. There are many shampoos that now come with keratin in them, so you can also use those.
  • To prevent hair and scalp dryness, perform a deep conditioning treatment once a month.

I personally enjoy how smooth and shiny my hair looks after a keratin treatment and because I've pretty much had it in my hair for the past year I can tell when it's gone and it's time for another treatment.

I hope you ladies find this piece to be helpful and please let me know about your experience with keratin.

What do you love about it?

What do you hate about it?


After

This is a picture taken by my makeup maven and hair stylist Prissy. If you'd like to book an appointment with her for makeup or a keratin hair treatment contact her via her website: prissymakeup.com.

Catch ya later fashionistas!

"The hair is the richest ornament of women."

Tuesday, July 26, 2011

A Guide to Stamp Manis

This past weekend, I hung out with my one of my besties for a Sunday filled of beauty and blogging. And let me start off by saying that if I'm your go to gal, Priscilla is my makeup maven. She is not only a licensed makeup artist, but she has an amazing understanding of makeup and all things beauty.

She also did a keratin hair treatment for me, which I will be sharing pictures with you later this week, and I'll be debunking the myths of keratin.

Below you will find a short video (that we filmed and edited ourselves) of the materials and steps needed to do your very own stamp manicure and please don't forget to check out this rad girl's blog and site.


Please note that you can also do pedicures in the same way,


Also, check out some pictures of the finished product. :)


The stencil also comes with a few other different styles, so the combinations of colors and styles you can do are endless. It's also very easy and fun.

Hope you guys enjoy this short and sweet post!

xoxo

Your GTG

"It's amazing what a little color on your hands or feet can do for you." -- Anonymous